Faking Global Illumination With Lightwave Using Motion Blur
A simple and speedy method suitable for animation, with an example scene for download.
created on 27.02.2004 - updated 29.02.2004 addition to a tip
Converted to full CSS layout on 05.06.2005
Introduction
Hi all! Thanks for all the positive feedback for my tutorials. I will be converting my site to suit PHP, for flexibility reasons.
This is not actually a tutorial, but it will hopefully give some ideas. I will share a technique for faking Global Illumination. This technique is heavily inspired by The Great Textured Area Light Hack Skydome (TGALH Skydome) by Jim May/Court Jester Creations, and the famous spinning light trick. TGALH Skydome is an excellent and ingenious method that beats the crap out of Lightwave's own global illumination with HDRI, in terms of speed and smoothness (tired of noisy pixels when lighting with HDRI?)
Unlike TGALH, my technique does not involve with HDRI lighting, tho with a few small tweaks, it could be made to do so. I'll leave that up to you: Just examine both techniques and merge them. So you can comfortably say this is just an ordinary skydome with a small twist. Here is the result:
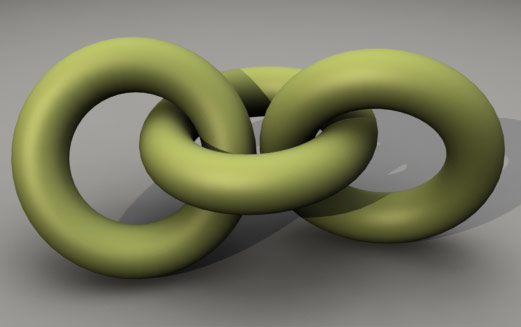
The original uncropped image was 640x480 and rendered in about a minute on my P4 2.4b, with (17 aa passes) settings with motion blur set to 49%. The scene contains the 12 active lights to fake GI and one directional light for added flavour (There are actually 24 lights in the dome, but only 12 are used because the rest of the lights are beneath the ground, more on that later). You can grab the scene from here. For this scene, I could have gotten away with 9 aa passes, which would make things even quicker.
As I am giving away the scene file, I don't think I should get into much detail as you'll have the scene to play with and learn anyway.
Principles of the technique
Motion Blur
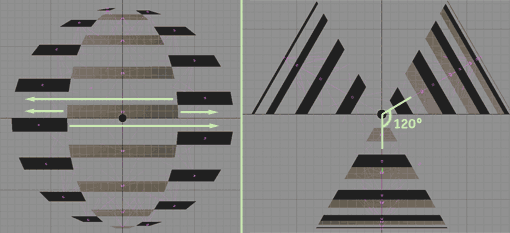
The basic principal of the technique is using the motion blur to spin a few lights around, just like the spinning light trick. Therefore, if you have 24 lights for the sky dome and will be using an enhanced high anti-aliasing with 17 passes, your scene will be lit by 24x17 lights, yielding the effect of 408 lights in the final image. Each pass will only be lit by 24 lights, which is really fast. Here you see how the lights line up in the scene (you can see all 24 lights) :
Luxigons
You'll see the lights are attached to some polygons. They are actually the polygons of my luxigon object, for which I used to make the lights look at the center of the scene in an orderly fashion. It also acts as a parent to these lights so I can scale the positions of the lights for different setups. It is only this lining of the lights that makes this different from other tricks. You'll see from front (image on the left) that the lights do not overlap on horizontal, and from top, you'll see the magical 120 degrees angle between each 3 arms that hold the lights.
This lining ensures that we will have the lights light the scene evenly with any AA setting. If we had only used one arm and put all the 24 lights in one vertical line, there would be much bigger gaps in the lighting, lesser the AA passes, bigger the gap. If we had distibuted the lights in only one side to lessen the gaps without putting them in 3 different arms with 120 degrees, this setting would only work for one AA setting, the lights would overlap at a higher AA setting, and there would be unlit gaps at a lower AA setting. Here are some images for you to see the sampling of the technique, using 24 lights: (I used a low diffuse ultra high spec high gloss object, and turned on the specularity of the lights for you to see the specs on the sphere)
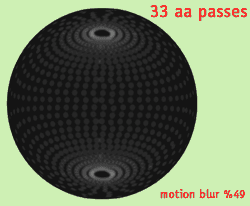

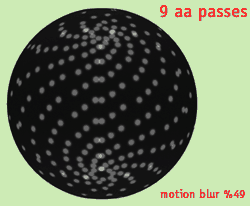
You can see the sampling of the lights are distributed quite evenly, but also notice that the as you go to the top or bottom, the lights become denser. This doesn't pose a a big threat. One of the solutions is dimming the lights closer to top and bottom; the closer to the top or bottom, the dimmer the light should be. Second solution would be using a smarter geometry for lining the lights. Third would be deleting some lights. The easiest and the more logical one is the first one, you can either do some clever math or improvize, which I'll leave all up to you; in the example scene and the render here, all the lights has the same intensities, which as you see is not bad at all anyway.
The more AA passes, the better quality the image will be. But you'll just have to wait a few minutes more.
Spinning
Here is how I rotated the parent object to spin the lights in :
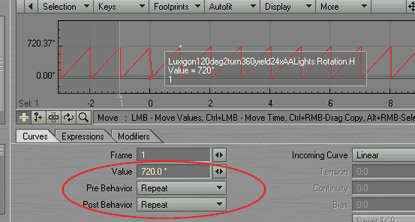
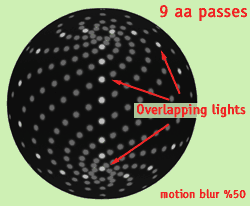
You'll see two keys at frame 0 and 1, and the rest is repeated. You'll also notice that I turn the object 2x360 degrees, because unlike most other tricks, I want to keep my motion blur settings at about 49%, while most other spinning light tricks use 99% motion blur, which is a tad too much of a blur for animation, if you have objects and camera moving! So if you want to use only about 25% motion blur (you'll have to use actually 24% to prevent overlapping of lights of the first and final pass), you have to turn the object 1440 degrees. Anything in between those numbers will need a little calculation :)
Here is the overlapping light problem at 50% motion blur, that's why we stick with 49% motion blur:
You'd be well advised to use the to mass-edit the light settings:
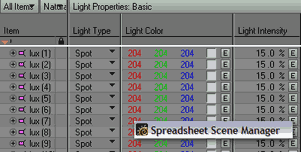
Above you can see the basic properties page where you can tweak the colours and intensities of the lights real quick. It is far easier to work in spreadsheet if you have lots of objects.
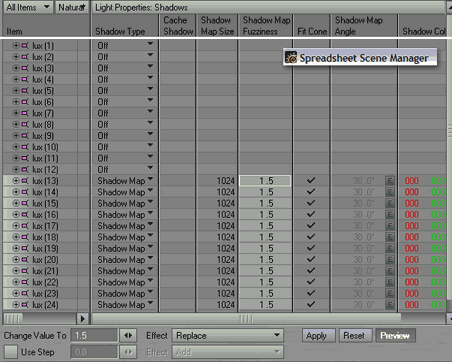
Shadow Map Settings
Above you can see the page where you can tweak the shadow map size and fuzziness, our lights use shadowmap lights. Fuzziness setting is very important, and for the example scene, it is set to 3. You'll also see that the first 12 lights cast no shadows, they are turned off (they also don't affect diffuse, setting accessible on another page of spreadsheet), as they are below the ground and we can save time by not calculating them.
Here is how the shadow map fuzzines affects the render, please hover your mouse over:
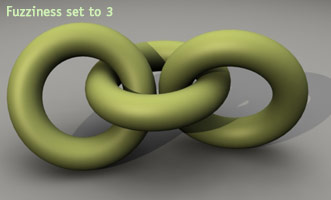
With smaller fuzziness, the ground seems textured while it shouldn't have any texture. You can make up for this by increasing the AA settings. With a higher fuzziess setting, there are some rendering problems at places where objects go into eachother (intersect). In this scene, I made sure that the objects do not interfere each other's space so I could go for a really high fuzziness.
Final Words
Hope you like this technique. If you ever merge the TGALH skydome with this one, please let me know, and maybe even share the know-how :) Here is another render with this method (The reflections are from a custom HDRI photo) :
Feel free to email me comments and critiques and even some fresh ideas :)