Preparing an animated navigation menu using (X)HTML and Javascript
Providing users with relatively accessible menus with animated backgrounds
Using classes and non-obtrusive code to compensate for no-javascript environments
updated on 16.05.2006: Feature fix
created on 22.04.2006
Introduction
I've had some nice feedback for my Javascript animation tutorial which has also been featured on Dom scripting task force website. Being the layman I am, this made me quite proud! Inspired by the positive feedback, I decided to make a detailed step by step tutorial on how to make a compelling menu using some xhtml, javascript and css, and the animation basics I laid out on my animation tutorial.
Samples
The reason
The moral of the story is not turning to flash animation just to show your users a little eye-candy, and eye-candy can be fed to users while still having an accessible, search-indexable, copy-pastable, nicely printable content. (Tho I will not concentrate on every issue here, you can have really good articles on accessibility on 456 Berea Street.) That said, flash is surely required if you want full animation and moving and jumping bits everywhere on your site.
Setting Up
Laying out the principles
For frame based animation, we will stack our animation frames vertically, and some sizes related to height should be defined in pixels, that's not condsidered good in terms of accessibility indeed as Internet Explorer users cannot change the sizes of fonts defined in pixels, but we need it for the simplicity of the tutorial. Stacking frames horizontally and setting the vertical positions to 50% would be "awesome", but Opera has a bug I'll explain later.
However, it is still possible to compensate for different sizes of text in animation with few modifications to our image design principles and code, which I may display in another article. Ironically, if you like to change, font-sizes on web pages, Opera is a superb alternative which doesn't break pages while resizing, and works perfectly with this technique while allowing the users to read content with gigantic font sizes.
Preparing the images
In this example, each frame is 210*30px. The size of the frames does not necessarily have to be the same as the element(s), for example, anchors on this page are actually 150px wide. Likewise, they wouldn't need to be of the same size height either, as you could go for such styles that would account for elements with different heights.
We will vertically stack all animation frames. Sadly, for best accessibility, stacking frames horizontally would have been better, as we could place the background image 50% vertically to account for different heights without having to compensate for that in our images; but Opera has problems with ultra wide background images so some frames go missing and background images are misplaced. One of the few times I am let down by Opera...
This still doesn't refrain you from using the same image and code to account for different height elements (e.g you can make the frames bigger vertically.) You'd just have to keep that in mind while preparing the image.
Here is the image for frame animation:
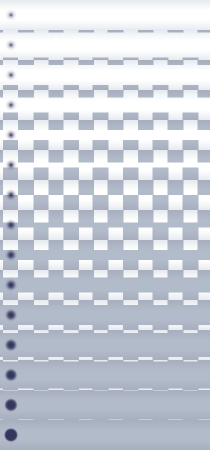
As you see, we have stacked each animation frame on top of eachother in a single image. This vastly reduces file sizes and http calls and any visual lag caused by loading seperate images. For this specific animation, PNG24 proved the best option, but depending on the images, you may use different types of formats. The image you see is merely 8.7 KB's, not bad for 15 frames of animation (Without the bullet image, it would actually be about 3.5KB's!)
The images are styled so that the last and first frames have enought contrast allowing the user to notice a change even when the animation is turned off, and the don't have a lot of contrast change so that if, for some reason, the size of the elements are bigger, the text is still readable on overflowed parts of the image with the same text color.
Details of this technique
General information
- This technique uses an improved version of the animation routines I have described in Simple javascript animation article. Don't mind the detailed explanations, you can set your animations up without knowing what everything does as you can use the examples as your guide, but I advise you take a close look anyway.
- This one improves on how to use variables by simply packing animation related variables under an array.
- For firing up the animation, I still use the old and destructive event attaching method for simple compatibility reasons with IE, because I simply want to use with my mouseover/out actions. Any further events needed could still be done using the advanced methods.
- The animation functions are independent of the event handling, you are free to use whatever methods you like for firing up the animation.
Html for the menu
I am writing the code in xhtml, simply because it enforces a somewhat neat looking code, served in good old fashioned html style. You can choose whatever that suits you, but always try to come up with well formed documents. I always go with the strict mode for the documents because it makes life easier with standards compliant browsers and IE.
HTML
<div id="animmenu" class="noscript">
    <a href='#'>Hover over me!</a>
    <a href='#'>Hover over me!</a>
    <a href='#'>Hover over me!</a>
    <a href='#'>Hover over me!</a>
</div>
If you are asking yourself "What? No tables, td, rows?? At least give me some br's!", you have to stop reading this and retune your body clock which is running about 4 years behind.
Seasoned html coders may argue using unordered lists would be a good practice semantic wise, but for this example where there is no branching of links, it is not needed. However, if your menu contains sub-items related to eachother, not using lists for the job should be considered a crime.
The class is there to support our unobtrusive approach, and I consider it mandatory. You could of course add another class next to noscript for other styling purposes, like on the code of this page I use class to style similar example menus.
Btw, this and other pre's on my site are straight out of Code Htmler on puzzleware.net
Styling our menu
CSS
#animmenu a  {
display: block; clear: both; width: 130px;
font-size: 100%; line-height: 30px;
padding: 0 10px 0 20px;
color: black; text-decoration: none;
margin: 0.5em;
background: #EAEEF2 url(menuanim.png) 0px 0px no-repeat;
}
#animmenu a:hover {color: #400;}
#animmenu.noscript a:hover {background: #AEB7C6 url(menuanim.png) 0px -420px;}
- Ensure our anchors are vertically stacked, clearing any floats and our line-height should be as big as our vertical size of our frames. We could also have an horizontal menu by floating all anchors next to each other.
- Our height is set with line height so no top bottom padding needed. I added a left and right padding to have some space for bullets, increasing the size to 160px horizontally. Our frames are 210px in width in this example so no problems there.
- Set color and remove underline, tho I shall remind removing underline may not always be a good practice as users may not notice the links if the anchors are not styled in an obvious way.
- Set a margin to all sides
- Set background image, complete with background-color for when images are turned off.
- Simply change color on hover, but we could also animate the color change. We don't provide background-color because that slows down IE because it is a crappy browser. Just make sure your text is readable when user turns off images. See the code of this page to see how to treat advanced browsers.
- Provide an alternative for when users turn off javascript, using the noscript class
Styling is a matter of choice, you can try anything indeed. I am assuming the browser is using the strict mode hence the standard box model, providing old box model css is not in the scope of this article, but is indeed possible without breaking this technique. Personally, I can (and have to) live with IE6 users but I couldn't care less about IE5.x users refusing to download the free Opera and Firefox. If you don't have zero tolerance policy to IE5.x users like I do or you are working on a commercial site that leaves no room for such IE5.x ignoring practices, you are free to provide stylings targeted at IE5.x preferrably using conditional comments.
is set at 30px which is the vertical size of our frames and it is better off if we set it in pixels. Font-size can be set in whatever unit you like, just check out how bigger fonts and text effects your design in case the user sets bigger fonts, but in this example, our 30px line height provides a good cushion for any font up to 30px in size. I just used some left padding to leave space for the bullet imagery. For , we must set at least a similar-to-image background color for cases where users turn off their images. You can use different values or use no repeats depending on how your image would cope with different element sizes caused by different font sizes that could be enforced by the user.
The important bit is providing a :hover pseudo-class for no-javascript situations. This class will be zapped by our javascript and a class will be added allowing any further styling based on whether javascript is active or not.
The animation code, explained
I'll try to explain the frame based animation as it is somewhat more complicated, but don't worry, it is much easier to use than to explain. Here's the code on this page.
Initiating the animation (for frame based animation)
Javascript
classChange(document.getElementById('animmenu3'),'scriptactive','noscript')
var animElements = document.getElementById('animmenu3').getElementsByTagName('a');
for(var i=0; i<animElements.length; i++) {
    animElements[i].bgAnim = {
    iPos:[0,0],
    pUnit:['%','px'],
    cFrame:0,
    mFrame: 14,
    dPos:[5,-30],
    mSec:15
    }
animElements[i].onmouseover = backPosAnimF;
animElements[i].onmouseout = backPosAnimR;
}
function backPosAnimF() {
    doBackPosAnim(this,this.bgAnim,this.bgAnim.cFrame, this.bgAnim.mFrame);
}
function backPosAnimR() {
    doBackPosAnim(this,this.bgAnim,this.bgAnim.cFrame, 0);
}
- Add "scriptactive" classname and remove "noscript" class from our menu div so our degrade styles are not used if javascript is active
- Select our anchors using using the parent div id as our guide
- Loop through our elements and stuff them with animation related variables "filed" under bgAnim using the object literal.
- Set our mouse events for starting animation
- On mouse over, call our animation function to animate our element from current frame (cFrame) till the max frame (mFrame), we are also telling our function where to fetch animation related data (in this case, )
- On mouse out, call the same animation function, this time starting from current frame back to frame 0
Animation function
Javascript
function doBackPosAnim(elem,vrH,startFrm,endFrm) {
//Animcode by www.hesido.com
    if (vrH.intID) window.clearInterval(vrH.intID);
    var actStep = 0, steps = Math.abs(endFrm - startFrm)+1;
    vrH.intID = window.setInterval(
        function() {
            vrH.cFrame = easeInOut(startFrm,endFrm,steps,actStep,1);
            vrH.cPos = [
                vrH.iPos[0]+vrH.cFrame*vrH.dPos[0],
                vrH.iPos[1]+vrH.cFrame*vrH.dPos[1]
                ];
            elem.style.backgroundPosition = vrH.cPos[0]+vrH.pUnit[0]+' '+vrH.cPos[1]+vrH.pUnit[1];
            actStep++;
            if (actStep > steps) window.clearInterval(vrH.intID);
        }
        ,vrH.mSec)
}
I won't go to details, this code is very similar to my other animation tutorial, only that it is somewhat neater as the variables are stored under an array and it has some more changes as it does frame based animation. Here are some varibles that are used:
- elem
- Our element that will be animated
- startFrm, endFrm
- Start and end frames, obviously, we need to be able to play any frame to anyframe, forwards or backwards
- vrH
- This is the array storing all animation data for our background position animation, it is in this example. We can, for example, stuff different animation variables under another array and pass that array to our function, so we can use the same function with different settings.
- vrH.intId
- This is the id of the interval we use for animation, the interval function is stopped using this number.
- actStep
- Step of the animation
- steps
- Total required steps of animation, calculated from current frame and target frame.
- vrH.cFrame
- Current Frame, this is updated with each frame advance or rewind, calculated simply with our easeInOut function which we reuse for a linear change using a power of 1.
- vrH.dPos
- 2 item array, delta x and y position for each frame. Denotes our size of each frame, in our example, it is set to 0 horizontal, and 30 vertical as our frames are stacked vertically, and we have to advance 30px's for each frame of animation.
- vrH.iPos
- 2 item array, inital x and y position used for frame 0, using units declared by vrH.pUnit. For example, it could be 0px horizontal and 50% vertical for frame 0, where we would animate only in pixels and keep the background position at 50% with 0 delta;
- vrH.cPos
- 2 item array, current x and y position calculated from: frame 0 initial position + frame number * delta position value. For example, on 3rd frame of our animaton, with dPos set to [0,30], cPos will be [0*3,3*30] = [0,90]
- vrH.pUnit
- 2 item array, units used for cPos, this way we can decide to use % or px for animating / positioning. For example we can use percentage of 50 and a delta of 0 for horizontal to center our background image (a delta of 0 means we are not animating that value)
Of course, with this function, by small modificiations to our mouse event handling functions, you can use this function for various types of animation.
Producing an animation step value at a given step
Javascript
function easeInOut(minValue,maxValue,totalSteps,actualStep,powr) {
//Generic Animation Step Value Generator By www.hesido.com
    totalSteps = Math.max(totalSteps,1)
    var delta = maxValue - minValue;
    var stepp = minValue+(Math.pow(((1 / totalSteps) * actualStep), powr) * delta);
    return Math.ceil(stepp)
    }
This generic animation step value generator is slightly modified from my other tutorial but it is "backwards compatible" with the only difference being a counter-measure to avoid a divide by 0 problem if totalSteps were accidentally set at 0. You can replace the old one with this if you are using the one from the other tutorial (I will update that page in due time also). The thing to note is that we can and do use it for both calculating frames which has to be linear and also for our motion based animation which can have ease in and out.
Adding - Removing classes using Javascript
Most important bit of unobtrusive scripting approach is providing similiar functionality for users who turns off their javascript or who use javascript incapable user-agents. We also have to keep in mind that some people would turn off their images, and we should have backup styles for them too, and this is fairly easy. For these examples, I remove the class and add a class using a nice little function I made:
Javascript
function classChange(elem,addClass,remClass) {
//Add + remove classnames function by www.hesido.com
    if (!elem.className) elem.className = '';
    var clsnm = elem.className;
    if (addClass && !clsnm.match(RegExp("\\b"+addClass+"\\b"))) clsnm = clsnm.replace(/(\S$)/,'$1 ')+addClass;
    if (remClass) clsnm = clsnm.replace(RegExp("(\\s*\\b"+remClass+"\\b(\\s*))*","g"),'$2');
    elem.className=clsnm;
    }
Let me explain this little gem:
- We can use the function to add / remove classes seperately (by passing to either addClass or remClass, we can omit that functionality), or do both at the same time.
- I am using some very simple and fast executing RegEx here, so don't start complaining right away(!).
- With this simple regex, I make sure we don't add the same class multiple times.
- No unnecessary whitespaces are created
- No removing the 'bar' out of 'foobar' when trying to remove the 'bar' class.
- All instances of 'bar' classes are removed, so we remove all incidences of the same class, making sure we get rid of that class.
- If we were to modify hundreds / thousands of elements, we could also allow our regEx to be cached, but we don't need it most of the time so the function is good as it is, but keep that in mind.
Where IE gets in the way
By this time, you should be asking whether or how IE hampers the technique, and you are right, IE6 or lower does have a silly bug, causing the busy pointer to be flashed for no apparent and justifiable reason during the animation, and the pointer can end up looking wrong until user slightly moves the pointer again after animation is finished. You can easily test this for yourself and see if this is too much too bear. The bug is caused when we change the size of an element with a background-image, or change its background-image position as we see in these example. This even happens with a:hover, actually, so this is not even directly related to noscript. Luckily there is nothing wrong with the animation itself as you will see and the links are clikcable as always, but still it may cause some concern for some of you. The good news is, I am happy to inform you that this bug is squashed with IE7Beta2. You can still prevent this function from running using conditional comments targeting IE6 and lower without touching IE7, and our non-obtrusive approach would still allow users to properly access the content, albeit without the animation.
Final Words
I hope this article comes in handy! It took several days to prepare this tutorial, and if this article saved some hair loss, helped you solve a problem, let you finish your project on time etc., you can donate a little to show your support though the contact page. If that is too expensive just to say thanks, you can alternatively send me a thanking email, and any feedback is much appreciated!
You can also send me animations you made using this technique so we can share more examples with the rest of the world.